
Hebie Viper Stadtmeister mudguards
Versatile and relatively stylish
 After a disappointing experience with the SKS Bluemels mudguards I wanted to try something else for my girlfriend's bicycle. It is outfitted with 40 mm wide tires, so the choice in mudguards is a bit bigger.
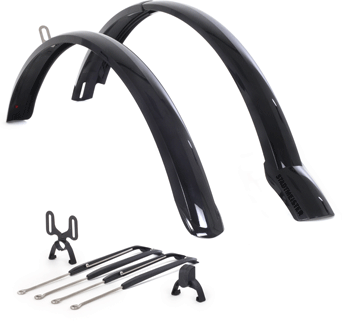
I selected the Hebie Viper Stadtmeisters because it does not have the troublesome V-shaped stays that interfere with the disc brakes. Instead the Hebie Viper Stadtmeister has a single stay on each side that can be snapped on anywhere along the mudguard and is even adjustable in length.
Like The SKS mudguards, they will detach when an object gets stuck and would otherwise lock up the wheel. At 42 mm they are the perfect width.
Mounting the front mudguard
Mounting the front mudguard was relatively easy. I did have to hang the top on the back of the fork so that the bottom was slightly lower. This way there was just enough clearance for the stays to go underneath the disc brakes. The two stays don't stick out on the back or sides and it looks much cleaner than the SKS mudguards.
The mudguards are glossy black plastic but do not have any mounting points for the stays, since they just snap on the sides which makes them look much cleaner and understated than the SKS mudguards. On the front there is a small red dot on top with the Hebie logo.

Mounting the rear mudguard
The rear mudguards is adjustable in length. It is made out of two pieces that you can slide in or out and then snap it together to secure it. At the longest setting I found it to be just long enough. It has a small flap integrated at the rear end that will help with back spray. On the bottom it is a bit wider, this will help against spraying on the chain.
On the bottom of the rear mudguard there is a slit for the bottom screw. This allows you to adjust the position, again something that is not possible with the SKS mudguards.
Just as with the SKS mudguards it comes with a mount that assumes there is a thread parallel to the mudguards, while my frame (and many others) has a thread directly facing the mudguard. The solution is to drill a hole in the mudguard.
The thread is for standard M5 screws, although it might not look like it it means that you need to drill a hole of 5 mm. It might look like you can get away with 4 or even 3 mm, but it really will not fit otherwise.
Drilling a hole is very easy. I used a drill meant for wood and had no problem at all. Just don't drill into the tires. the good thing is that even if you don't drill exactly where you planned the slit on the bottom will allow you to position the mudguard so that it will line up with your drill hole.
Because the bicycle has a smaller 19" frame there was not enough space for the ring lock that required 46 mm. By using a slightly longer screw and adding some washers and a piece of plastic that came with the mudguards as spacers.
Screwing in the bolt was a bit finicky, but that is mostly because I did not bother to remove the wheel and just deflated the tire.
The rear mudguard requires 3 mounting points to be secured. For the third one you can use the adjustable stays just like in the front, or attach it directly to the rear rack. I chose the last option. It is more stable than the stays, looks cleaner, weights less and there are no worries about brake clearance.
The rack mount is plastic and wraps around the fender. If you plan ahead you might be able to slide it on before you snap it together, but I did not. I was able to snap it on by pushing it and using a small screwdriver to pull the lid over the edge. The mount did not seem that strong so I was quite careful and was eventually able to snap it on.
Verdict
I like these mudguards a lot. They were a little bit more expensive than the SKS mudguards, but they look better are easier to install. These are my favorite so far. They are not the prettiest ones around, but come with plenty of mounting options that make it possible to fit on many different bicycles.